Dashboard
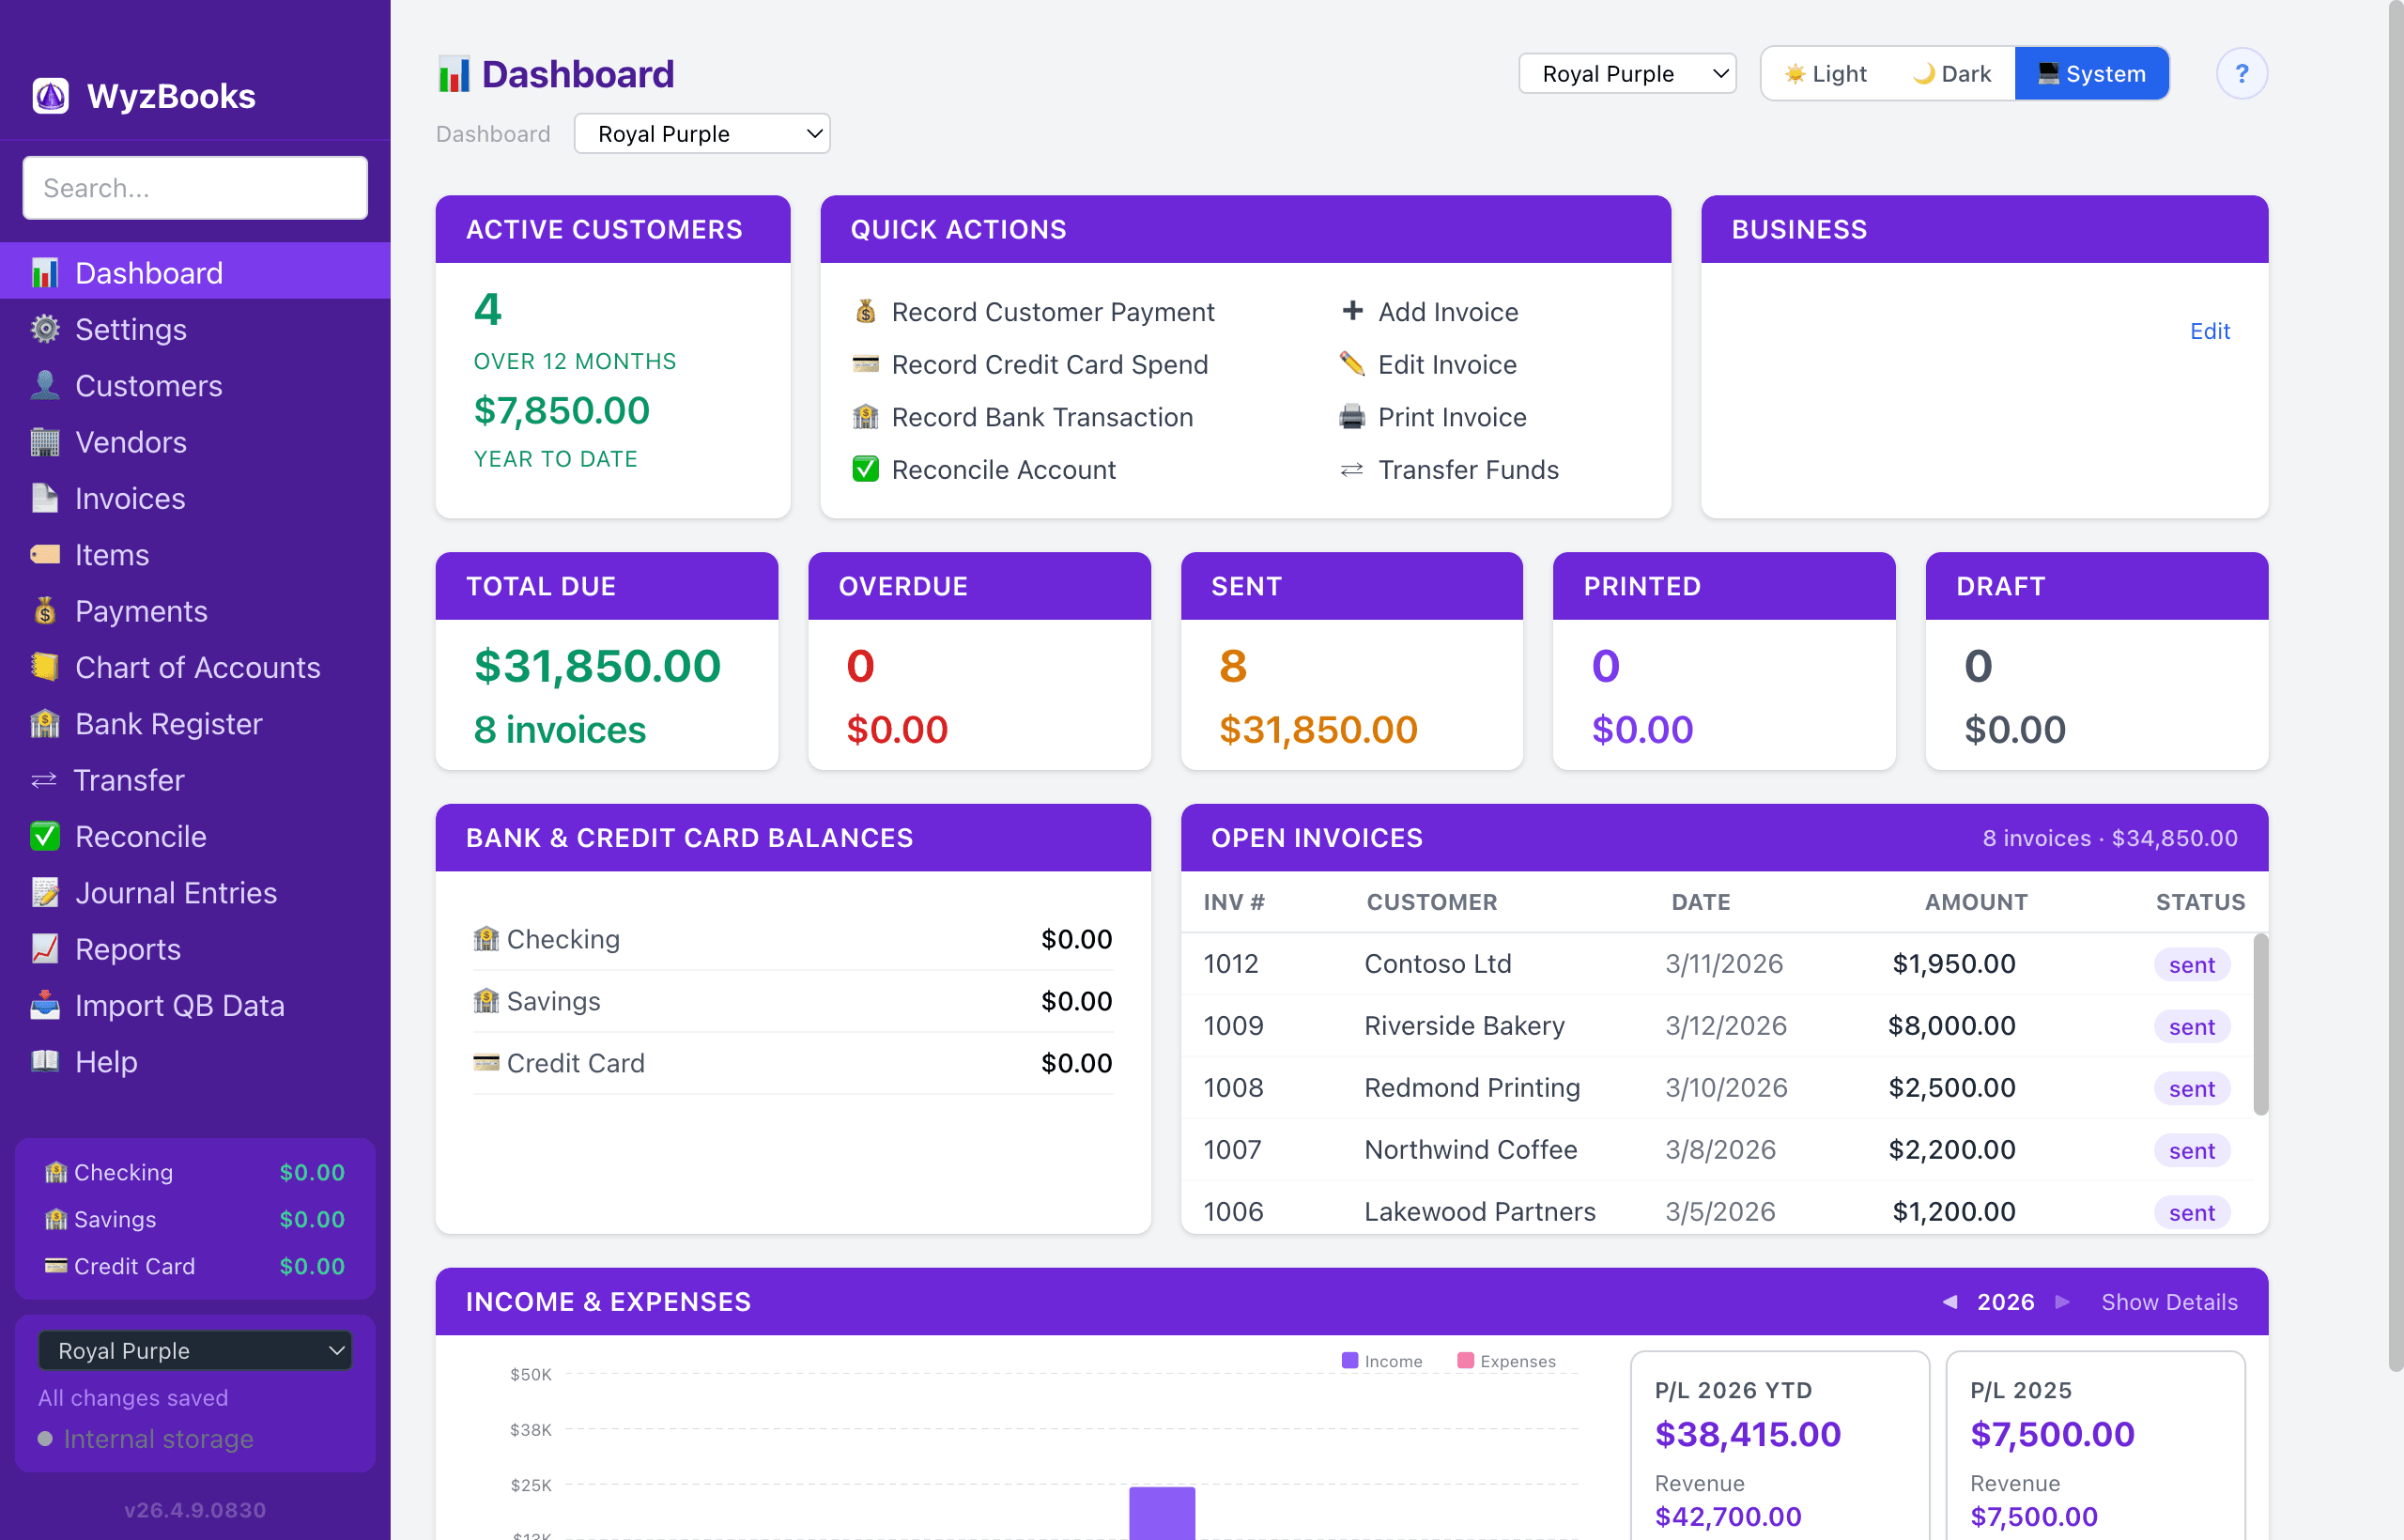
The Dashboard is your home screen, providing an at-a-glance overview of your business finances. Click any summary box or invoice row to navigate directly to the relevant page. Right-click most clickable elements for a context menu (when tabs are enabled). The menu shows "Open in New Tab" by default, or "Open in Same Tab" when the Open Links in New Tabs setting is active.
The header is organized in two rows. The top row shows the page title, a Cloud Sync status badge (when enabled), a Light / Dark / System appearance toggle, and a help icon. The second row places the cloud messaging compose bar on the left (when Cloud Sync messaging is enabled) and theme controls on the right: a Global Theme preset dropdown, a Dashboard Theme preset dropdown, and a Reset Layout button (visible when the row order has been customized). Both theme dropdowns let you switch between built-in or user-defined presets. Changes apply immediately and are saved to wyzbooks.ini. When switching from a custom theme, a confirm dialog offers: save as new preset, overwrite existing, or discard and apply.
Active Customers, Quick Actions & Business Info
The top row shows three sections side by side:
- Active Customers — Number of customers with at least one paid invoice in the last 12 months, plus year-to-date revenue total. Click to go to the Customers list.
- Quick Actions — Shortcut buttons for common tasks: Record Customer Payment, Add Invoice, Record Credit Card Spend, Edit Invoice, Log Hours (when a Consulting item exists), Record Bank Transaction, Print Invoice, Reconcile Account, and Transfer Funds. Record Customer Payment, Record Credit Card Spend, Record Bank Transaction, and Log Hours open popup forms directly on the Dashboard; other actions open the relevant form or picker. All Dashboard popup forms accept Enter from any field to submit (matching the Log Hours pattern), and their Payee/Category fields use inline auto-completion: as you type, the moment what you've typed is a unique prefix of one option, the rest is appended as highlighted text — Tab accepts.
- Log Hours — Opens a modal form to add consulting time to an open invoice. Select an invoice from a dropdown (filtered to unpaid invoices showing number, customer, and balance due), enter a description (pre-filled with today's date in YYYYMMDD format), hours (0.25 step), and rate (pre-filled from the last rate used). Press Enter to submit. On save, a line item is appended to the invoice with the Consulting item and account. The confirmation dialog offers Log More (reopens with the same invoice) or Done.
- Business Info — Displays a header bar with your company name, followed by your address, phone, email, and website (from Settings → Profile), plus your company logo. Click Edit to update your business profile.
Summary Boxes
A row of five clickable stat cards showing invoice status at a glance:
- Total Due — Combined dollar amount of all Sent, Printed, Draft, AND Overdue invoices. Click to see the filtered open invoice list. (Overdue is intentionally included — "Total Due" reflects every unpaid invoice regardless of due-date status, matching the Open Invoices list below.)
- Overdue — Count and outstanding balance of invoices past their due date. Click to see the overdue invoice list.
- Sent — Count and outstanding balance of invoices in Sent status. Click to see the filtered list.
- Printed — Count and outstanding balance of invoices in Printed status. Click to see the filtered list.
- Draft — Count and total amount of invoices in Draft status. Click to see the filtered list.
Bank & Credit Card Balances
Shows current balances for all active bank and credit card accounts. Each row is clickable and navigates directly to that account's register.
Inactive accounts are excluded automatically.
Open Invoices
Lists all invoices with Sent, Printed, Draft, or Overdue status, sorted by balance due (largest first). The header shows the total count and combined outstanding balance.
Each row displays the invoice number, customer name, balance due, and a color-coded status badge. Click any row to open it in the invoice editor.
Income & Expenses
- Monthly Chart — An interactive bar chart shows monthly Income (blue) and Expenses (red) for the selected fiscal year. Navigate between years using the ◀/▶ arrows, year dropdown, or ↻ reset button. Click any bar to open the P&L report for that year. Hovering over a bar shows a tooltip with the month name and dollar amount.
- P/L Summary — Three summary boxes below the chart: P/L This Year (with Income and Expense subtotals), P/L for the comparison year, and Year-over-Year change (shown as a percentage when comparison data exists). Each box breaks down Income and Expense amounts individually.
- Show Details — Click "Show Details" to expand a fiscal year breakdown table showing Income, Expenses, and Net P/L for each year with transaction data.
Cloud Sync Badge
When Cloud Sync is enabled, a status badge appears in the Dashboard header showing the connection state: Cloud (blue, connected), Connecting (yellow), Reconnecting (yellow), or Cloud (offline) (gray).
- Status popup — Click the badge to open a popup showing: server hostname, connection status, sync version, offline queue count (if any), and divergence state. The popup also provides Check Sync, Settings, and Disconnect buttons.
- Dismiss the popup by clicking outside, pressing Escape, or clicking the × button.
Cloud Messaging
When Cloud Sync is connected with messaging enabled, the Dashboard serves as the message center for your team.
- Compose bar — A text input and Send button appear in the second header row (left side). A sent/failed indicator shows the status of your last message.
- Message cards — Received messages appear as blue notification cards above the main dashboard content. Each card shows the sender name, timestamp, message text, and a dismiss (×) button. Messages persist until manually dismissed.
Message Badge
- The sidebar footer shows a "● N messages" badge whenever messages are present. This badge is visible on all pages, not just the Dashboard.
- When a new message arrives, the badge flashes yellow for 3 seconds, then settles to its normal blue color.
- Click the badge to navigate directly to the Dashboard where you can read the full messages.
When your data is empty (no invoices, payments, or customers), the Dashboard shows a "Get Started" link that navigates to the Getting Started help topic.
Customizing Layout
All four dashboard rows can be reordered by drag and drop. Grab any row and drag it up or down to rearrange the layout. A blue indicator line shows where the row will be placed.
Your custom layout is saved automatically and persists across app restarts. It is also included when exporting and importing data files.
Click the "↺ Reset Layout" button in the header (visible only when the layout has been changed) to restore the default row order.